Home

Events

Showing posts with label recipes. Show all posts

Sunday, January 18, 2015

Do These Five Things On The Weekend And Eat All Week!

After raising five children I learned a few things (some a little late:)). And one of the most important was how much easier a little weekend prep can make the following five days of meal planning. Here are my top five tips making it easier to J.E.R.F. (just eat real food) instead of succumbing to the drive-thru line (again).


1. Roast a chicken.

That's mine, done on Sunday, for the week's use.


Find the best chicken you can. I drive an hour to get local, pasture-raised birds, but if the local grocer is your only choice, at least shop smart.  Don't forget to check out the "specialty" sections of your grocer. When I can't get my favorite free-range fowl, I head to the seafood section of my big-box grocery store. For some reason, there amongst the shrimp are bison, buffalo, and the chickens I consider "second-best." For whatever reason they are not with all the other chicken brands . . . Do some detective work around your favorite grocery.

Add whatever will fit in your roasting pan (I LUV my old-faithful covered cast iron skillet:)) Potatoes. Carrots. Onions. Celery. Peppers. Mushrooms. Herbs. White-wine. Get fancy if you can, but don't let plain and simple discourage you. Onion, salt, and pepper will do just fine.

After the chicken is done, debone and set the meat aside. (Don't disturb the meat juices in the pan.) Put the bones back in a stock pot with celery, onion, peppers, carrots, plenty of salt and pepper, etc. etc. and simmer for some hours. While the stock simmers let's get back to that roasting pan. Watch this short video to see how I utilize every bit of that bird---the intermediate stage doesn't look too appetizing but the finished product/ YUM:))


2. Saute a pound or two of ground beef with onions and peppers. This will become the base of pasta sauce for spaghetti, filling for tacos, or a protein-upping, toss in after pan stewing onions, potatoes and cabbage for a hearty Hungarian Goulash. In the summertime I will often toss a 1/2 cup of this cooked ground beef on top of a green salad, add some thousand island dressing and croutons (both homemade, of course:)) Here's a fancy version just to make you feel good about this shortcut, but simple is equally YUMMY!!

3. Cook some brown rice and/or quinoa. Enough for your family two or three times over. Cook it in that awesome chicken broth"by-product" from #2 above. I don't have to tell you all the ways you can combine these yummy sides with the meat bases above to create some spectacular meals . . . do I?

4. Make sure you have three good fresh vegetable choices on hand that are not-so-perishable. In most parts of the country carrots, broccoli, kale, cabbage, and cauliflower are always available and keep well for close to a week.

5. Always keep onions, peppers, garlic and celery. ALWAYS!!! Even if you (gasp!) have to occasionally throw a wilted casualty out, it's worth it to have these staples handy when you need them. 

Friday, December 19, 2014

Tuna To The Rescue!


Long morning of pre-Christmas errands. Hungry. Eat out? 

Hmmm . . . Would be expensive 

and not as nutritious as home cooking.


So I resisted and ten minutes after I got home 

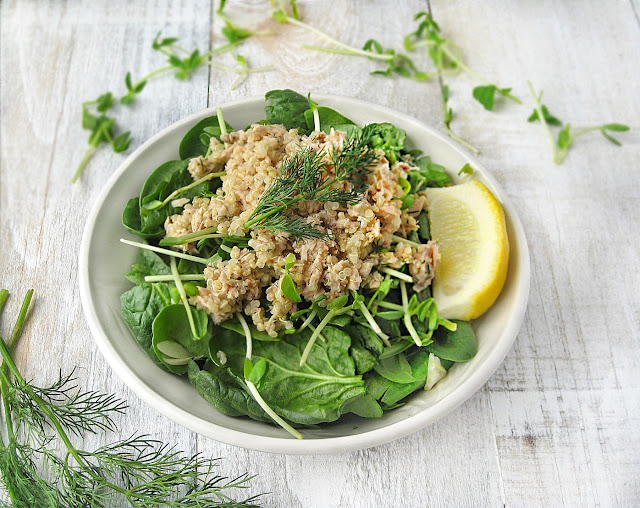
had this on the table. 


Okay. I admit this recipe is a bit of a throw-back to the 1960s or early 70s. Some of you closer to my age will
remember . . . You know, the decade when moms did some pretty crazy things with canned tuna.


You can't really blame homemakers of that decade for their weird experimentation. Pre-packaged convenience foods of all kinds were experiencing a surge in popularity nearly 20 years after the initial flood had hit supermarket shelves----in most cases straight from military commissaries.


Consumption of canned tuna soared in the years after the two world wars---when it had first been introduced on a wide scale, providing a high-protein, portable and convenient food for soldiers in the field. By 1954 the world’s largest tuna producer and consumer was the United States. Back then the standard can contained seven ounces of tuna. In the 70's most major producers reduced their can size to 6 ounces---prices moving in the opposite direction, of course!! And by 2010 major tuna fish companies had quietly downsized cans from six to five ounces.


Even though those interesting congealed creations may not appeal to today's fastidious foodies, don't throw out the tuna with the gelatin molds just yet!! Wild-caught and properly canned tuna is still one of the highest quality convenience foods around. And, notwithstanding shrinking cans, it's a great value. A 3-ounce serving contains a whopping 25 grams of protein, 1,300 mg of omega-3s, an impressive amount of vitamin D and is a good source of selenium.

I always keep canned tuna in the pantry. It's just so easy and versatile. And, I'm not ashamed to admit I make my tuna salad pretty much the same way my mom did (does). Why not? It tastes great! And as mom's learned more about healthy food choices, she's come on board with a few upgrades herself, using organic ingredients, adding in more fresh, raw veggies, and being a bit more adventurous with the seasonings.

Other than substituting a cream cheese/yogurt combo for the mayo (I was out, but I prefer mayo---these replacements yielded results a bit too rich and tangy) this is what I include most of the time. (Not pictured: onion and a good quality relish--I experiment with ethnic varieties a lot.)


I mash egg yolks in with the wet ingredients and mix the chopped egg whites in with the veggies and tuna.


Here are some ways I've gotten adventurous with the can myself---a lot prettier than my standard mix!

Source: Nugget Markets. Recipe HERE


Source: Good Food. Recipe HERE


Source: Simply Quinoa. Recipe HERE


Don't you wonder if people in the future will look back at these recipes as funny and unappetizing!! Surely not!!! You think . . . ? Maybe . . . ? NO!  Certainly these are timeless! Hmmm . . . but don't we always say that about interior design, architecture, hair and clothing styles . . .


Wednesday, November 19, 2014

Savory Sauté


Out in the garden the cabbage is well on its way to forming heads but, alas, I can never wait. I'm always out there with my kitchen scissors, stealing those dark green, tender, baby leaves from all sides. I only clip a few from each plant, hoping they won't notice and will go about their business producing some nice, for-real cabbage heads in a few more weeks.

Aren't those little new potatoes the prettiest? Found them at Fresh Market, conveniently packaged in  little net bags. I bought them with the cabbage in mind for one of my favorite (and so simple) cold weather dishes.

In my coveted cast iron skillet I sauté the olive oil-coated sliced potatoes and onions on high heat to start the browning process. Then I cover with the skillet lid, turn down the heat and let the potatoes cook until tender. I'm careful not to turn the potatoes so the bottom layer of slices stay extra crispy brown.


The only seasonings are coarse Celtic gray salt, cracked pepper, and caraway seed.


The thinly shredded cabbage leaves are added last and only cooked to tender crisp. If I'm in the mood for a heartier stew-type dish. I'll add some butter, sprinkle with some flour, stir in some milk or half and half and cook on low until cabbage is tender and sauce is thickened. For the creamy version I'll usually stir in some Taleggio cheese or sprinkle with Parmesan and serve with toasted rye bread. YUM!!!


Tuesday, April 3, 2012

Frittata Shortcut--Compliments of Amy's Burritos

Here's my secret ingredient for a quick and easy frittata that looks and tastes way more complex than it deserves--deliciously so!!


Let the burritos defrost just enough (not all the way) to slice through easily. I used four for the quantity I prepared--enough to fill a 14 inch cast iron skillet.  Slice the burritos into 1/2 inch medallions and place into a greased oven-proof skillet or casserole.


Here's where you can be completely creative, depending on what you have on hand. I used sweet mini bell peppers and onion. If I had had some, I would have added jalapeno, poblano, chipotle, or any other peppers. Fresh cilantro is also nice. If you are going vegetarian on this dish, just add the peppers in with the eggs (step to follow).

For this occasion (dinner) I decided to add a pound of gently browned ground beef, but for breakfast, brunch, or luncheon, it's equally delicious vegetarian style.  At the very end of the browning (Don't overcook the meat. It will finish in the oven.) I added in the peppers and onions and sauteed briefly.


Hand beat enough eggs, with a little milk, salt and pepper (you be the judge on the number of eggs) to barely cover the sliced burritos. If using meat, spread over the burritos. Pour the egg mixture over all. At this stage, you can get creative again and add any cheese you have on hand. I like Sargento Artisan Blends Shredded Authentic Mexican Cheese.


I can't tell you exactly at what temp and how long to bake. It depends on the size of your pan, depth or ingredients, etc. This day I baked on 350 for 1/2 hour. Just keep checking and don't overcook--rubbery eggs =YUCK! Remember, it will keep "cooking" as it cools. Let set for at least 10 minutes. Slice in wedges and serve with chips, sour cream, salsa, extra cheese, and/or your favorite salad and veggies. Great for potluck, as it serves fine at room temperature. People will rave and never guess your "secret" ingredient, unless you choose to share!